Step 2a: Hardware - Buttons and LEDs
The code for this step is found here.
You must implement two functions for the framework, the first for initializing the hardware and application, the second the main task. A FreeRTOS task never returns, so the second function contains an infinite loop. The framework generates events for the system timer, hardware functions, or incoming ZWave traffic. These events are gathered in a queue that has been wrapped to handle event notifications (QueueNotify) and routing (EventDistributor); these wrappers are found in the Components directory in the SDK. The first thing our task must do is to create the event queue, wrap it, and register the result with the framework.
The demo programs define two sets of application events, putting one enumeration EVENT_APP in the file events.h and the other enumeration EApplicationEvent in the source code. The first uses a local "job" queue created for events outside the framework, and signals state changes during learning, non-volatile memory access, power and battery management, and within the application. We won't need to use these, and omit the file. The second is a group of four ZAF events, from the timer, incoming frames, ZWave state, and hardware and application events. These we do need. Each event needs a handler. ZAF provides one for the timer, we'll define one for the hardware, and leave a stub for the other two for now.
The expansion board has four buttons and four LEDs. Two of each tie to components on the main board. The functionality we'll eventually implement is
|
Button 1 |
ZWave inclusion/exclusion |
|
Button 2 |
toggle data logging |
|
Button 3 |
read temperature |
|
Button 4 |
read humidity |
We'll flicker LED2 while we're logging sensor readings, and turn LED4 on when a single read is in progress. LED1 is the indicator signalling that the node is in learn mode or is included. For logging, the number of samples to take and the time between them will be fixed for now, until we add a ZWave configuration command to set them. For Step 2a we'll use a timer to simulate the sensor read while driving LED4 correctly, and Button 2 will just toggle the logging mode (ie. turn LED2 on or off).
Implementation
There are two header files in the SDK that define button and LED operations. Only one, board.h, must be included in our application. The other will be found by passing a -D define to make, which is done by adding a symbol to the C/C++ Build items in the project's Properties. Including board.h requires adding many directories to the include path and linking files to the project:
-
Add ${SDK}/ZAF/ApplicationUtilities to the C/C++ Include list.
-
Add ${SDK}/platform/emlib/inc to the C/C++ Include list.
-
Add 'RADIO_BOARD_ZGM130S = 1' to the C/C++ Symbols list.
-
Add 'EXT_BOARD_8029A = 1' to the C/C++ Symbols list.
-
Link ${SDK}/ZAF/ApplicationUtilities/board.c under ZAF_AppUtil/.
-
Add ${SDK}/platform/emdrv/gpiointerrupt/inc to the C/C++ Include list.
-
Link ${SDK}/platform/emdrv/gpiointerrupt/src/gpiointerrupt.c under hw/.
-
Link ${SDK}/ZAF/ApplicationUtilities/board_indicator.c under ZAF_AppUtil/.
-
Link ${SDK}/ZAF/ApplicationUtilities/AppTimer.c under ZAF_AppUtil/.
-
Link ${SDK}/platform/emlib/src/em_letimer.c under hw/.
-
Add ${SDK}/Components/SwTimer to the C/C++ Include list.
-
Add ${SDK}/Components/DebugPrint to the C/C++ Include list.
-
Link ${SDK}/ZAF/ApplicationUtilities/ZAF_uart_utils.c under ZAF_AppUtil/.
-
Add ${SDK}/Components/Assert to the C/C++ Include list.
-
Link ${SDK}/ZAF/ApplicationUtilities/EventHandling/zaf_event_helper.c under ZAF_AppUtil/.
-
Add ${SDK}/Components/EventDistributor to the C/C++ Include list.
-
Add ${SDK}/Components/QueueNotifying to the C/C++ Include list.
-
Add ${SDK}/ZAF/ApplicationUtilities/EventHandling to the C/C++ Include list.
-
Add ${SDK}/ThirdParty/Freertos/include to the C/C++ Include list.
-
Add ${SDK}/ThirdParty/Freertos/include/gecko to the C/C++ Include list.
-
Add ${SDK}/util/third_party/freertos/Source/portable/GCC/ARM_CM4F to the C/C++ Include list.
-
Add ${SDK}/Components/Utils to the C/C++ Include list.
-
Add ${SDK}/Components/NodeMask to the C/C++ Include list.
-
Add ${SDK}/ZAF/ApplicationUtilities/PowerManagement to the C/C++ Include list.
-
Modify src/config_app.h to include defines for GENERIC_TYPE, SPECIFIC_TYPE, DEVICE_OPTIONS_MASK, MAX_TXPWR, and MEASURED_0DBM_TXPWR. The latter two will eventually end up in src/config_rf.h in Step 3.
Items #1-11 are needed to drive the devkit boards, with #5-7 for buttons, #8 for LEDs, and #9-11 for timers. Items #15-21 give us events and handlers for the framework. The others are support functions. In the application we use the DPRINT debug macro (#12) to write messages to the UART, which we can monitor in Simplicity Studio on the device console. This requires including the ZAF_uart_utils.h header file in our source file (#13). The SizeOf.h header (in #22) provides a macro sizeof_array which we use as a shortcut. AppTimer.h (from #9) provides a timer we can set and run within the application. The other header files we must include define functions and constants for the framework.
The application contains just a few functions. ApplicationInit() sets up the program and hardware, and ApplicationTask() finishes set up and contains the main event loop. We have one event handler, handle_event(), that reacts to button presses, and a callback simulate_ht() that runs when the timer that's pretending to be a sensor read finishes.
In the ApplicationInit() function we do any set-up needed before starting the FreeRTOS application task. This includes the timer (call to the framework function AppTimerInit()), initializing framework variables (for the radio frequency, basic NIF information, and security), the devkit boards (framework function Board_Init()), and UART (framework function ZAF_UART0_enable()) once we're using the DebugPrint module. The function finishes by registering the task function, which allows FreeRTOS to start it.
The ApplicationTask() function continues set-up before entering the event loop. We tell the timer about the task with AppTimerSetReceiverTask(), and finish framework setup by calling ZAF_Init(). We create a small event queue with the FreeRTOS function xQueueCreateStatic(), wrap it with the event notifier by calling QueueNotifyingInit() and ZAF_EventHelperInit(), and then set up the event router with EventDistributorConfig(). We finish hardware setup for the buttons with Board_EnableButton() and Board_SetLed(), and create a software timer to simulate sensor reads with AppTimerRegister(). Finally we go into the infinite loop, using EventDistributorDistribute() to direct events to the appropriate handler.
handle_event() pulls events from the queue with xQueueReceive. It compares them to BTN_EVENT_SHORT_PRESS(BOARD_BUTTON_PB[1-4]) to determine which button has been pressed, and reacts appropriately. Use Board_SetLed(BOARD_LED[1-4], LED_[OFF|ON]) to change a LED, and TimerStart(&timer, time_in_ms) to create a small delay before using simulate_ht() to turn off LED4.
The demo programs include many global variables. We've tried to reduce them as much as possible, only keeping those that aren't passed between framework functions or which must be statically allocated. The framework, for example, must always be able to see the NIF structure, radio configuration, and security keys, as well as an overall ZWave configuration. The event queue is needed in the handlers. Our application must have the timer always available, a buffer to hold the debug log, and a counter for the simulated log.
The call to ZAF_Init() pulls in still more files and include directories.
-
Add ${SDK}/ZAF/ApplicationUtilities/TrueStatusEngine to the C/C++ Include list.
-
Add ${SDK}/ZAF/CommandClasses/Common to the C/C++ Include list.
-
Link ${SDK}/ZAF/ApplicationUtilities/ZW_TransportSecProtocol.c under ZAF_AppUtil/.
-
Link ${SDK}/ZAF/ApplicationUtilities/ZW_TransportMulticast.c under ZAF_AppUtil/.
-
Link ${SDK}/ZAF/ApplicationUtilities/ZAF_command_class_utils.c under ZAF_AppUtil/.
Since we're not hooking up ZWave yet, we'll make local copies of some of the framework files and remove functionality so they compile. In Step 3 we'll restore the edits and talk more about what's going on. From ${SDK}/ZAF/ApplicationUtilities
-
Copy ZAF_TSE.c into ZAF_AppUtil/, remove the include of association_plus.h and comment out the call to handleAssociationGetnodeList(). This is so we don't have to pull in association groups.
-
Copy ZW_TransportEndpoint.c into ZAF_AppUtil/, remove the inclusion of multichannel.h, and comment out the call to CmdClassMultiChannelEncapsulate(). Also add a stub in our application program for Transport_ApplicationCommandHandlerEx(), which requires including the header files ZW_classcmd.h and ZAF_types.h (which are already on the include path).
The project now contains 17 files between the hw/, src/, and ZAF_AppUtil/ directories, although most are links to the SDK.
|
hw/ |
src/ |
ZAF_AppUtil/ |
ZAF_CC/ |
|
|
config_app.h |
ZAF_TSE.c |
|
|
|
HTSensor1.c |
ZW_TransportEndpoint.c |
|
|
linked within Simplicity Studio |
|||
|
em_letimer.c |
|
application_properties.c |
|
|
gpiointerrupt.c |
|
AppTimer.c |
|
|
startup_zgm13.S |
|
board_indicator.c |
|
|
system_zgm13.c |
|
board.c |
|
|
|
|
ZAF_command_class_utils.c |
|
|
|
|
zaf_event_helper.c |
|
|
|
|
ZAF_uart_utils.c |
|
|
|
|
ZW_TransportMulticast.c |
|
|
|
|
ZW_TransportSecProtocol.c |
|
In our application we find six functions.
|
function |
role |
description |
|
handle_event |
button press |
set LEDs, simulate sensor actions |
|
handle_dummy |
placeholder |
empty ZWave command handler |
|
simulate_ht |
placeholder |
turn off LED showing logging |
|
ApplicationInit |
ZAF |
pre-task system setup |
|
ApplicationTask |
ZAF |
post-task setup and event loop |
|
Transport_ApplicationCommandHandlerEx |
ZAF |
empty ZWave command handler |
The project compiles, the LEDs show button functionality is working, and you can monitor events in the debug log console (by right clicking on the J-Link adapter, launching a console, picking the Serial 1 tab, and typing a return there to start the link).
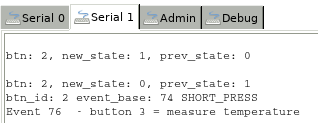
Console trace of button 3 press. The framework generates lines starting with 'btn'.
Next we'll access the sensor.