Step 1: Setup and Framework
The code for this part of the demo is found here.
Build Process
A Java package within Simplicity Studio generates a makefile and directory hierarchy based on a project's settings, accessible by right clicking on a project in the Explorer window on the left and choosing Properties. The builder creates a directory named after the build configuration ('GNU ARM v7.2.1 ‑ Debug' for example) and creates sub-directories for each directory in the project. It puts a subdir.mk makefile in each, which when run will create a header dependency list (*.d) and object file (*.o). The final binaries are put in the build directory.
The project settings are stored in the file .cproject. You can see how the commands in the makefile are built up from entries in the C/C++ Build Settings part of the Properties dialog (either by right-clicking on the project name in the Explorer, or under the Project menu entry). The long command line for the compiler/assembler/linker contains the Includes files (-I prepended to each) and Symbols (-D), with checkboxes in other entries adding flags, as well as the 'Other flags' list found under Miscellaneous. Compiling is done in the sub-directories by the subdir.mk files; the top makefile links the binary in AXF format and converts it to BIN, HEX, and S37 formats. Each source file has its own make target, although the commands are the same except for the file names.

Build command found in Project Properties. Arcs indicate source of command line options within dialog.
We prefer to link to source files in the SDK rather than copying them into the project. If done within Simplicity Studio the links do not appear in the file system. They'll appear in the Project Explorer window with an arrow in the file icon, and will be listed in the Linked Resources/Linked Resources entry of the Project Settings window. When creating the Makefile the Java package will include a target for each source file with the link path expanded. Header files, however, cannot be treated this way. They must either be found in a directory in the include path, or you must symlink them in the file system (that is, not link them within Simplicity Studio).
You'll find abbreviations for some directories under Resource/Linked Resources/PathVariables, of which STUDIO_SDK_LOC is useful, and two more under C/C++ Build/Build Variables, which provides StudioSdkPath to use within the build dialog.
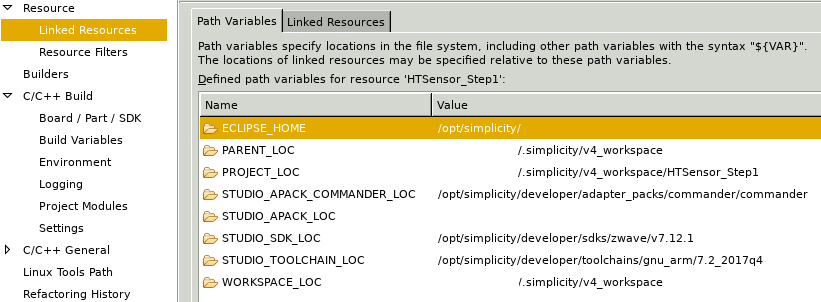

Project Properties defining abbreviations. Use STUDIO_SDK_LOC except in the build settings, where the variable is StudioSdkPath.
You can delete the build directory ('GNU ARM v7.2.1 ‑ Debug') at any time and the Build command within Simplicity Studio will recreate it. Once it exists, if the compiler is on your path, you can run make from the command line. It's found at simplicity/developer/toolchains/gnu_arm/7.2_2017q4/bin/. It might be possible to recreate the makefile from the .cproject information, but it seems easiest to let the Java program do the work.
SDK Contents
We'll see as we go along that the files and libraries we need are scattered throughout the SDK directory.
To keep paths short, we'll use SDK for <simplicity install dir>/developer/sdks/zwave/v7.12.1. For SDK you should substitute STUDIO_SDK_LOC everywhere within Simplicity Studio, except in the build settings when you would use StudioSdkPath.
|
directory |
contents |
|
${SDK}/ZWave/lib |
slave and controller libraries |
|
${SDK}/ZWave/API |
header files |
|
${SDK}/ZAF/ApplicationUtilities |
application framework |
|
${SDK}/ZAF/CommandClasses |
some ZWave commands |
|
${SDK}/util/third-party/freertos/Source |
FreeRTOS source |
|
${SDK}/ThirdParty/Freertos/include |
FreeRTOS headers |
|
${SDK}/Processor/gecko |
devkit configuration, including pins, clocks, UART |
|
${SDK}/Components |
modules for timers, assertions, event groups, queues |
|
${SDK}/hardware/kit |
display hardware and I2C bus |
|
|
devkit board is EFR32FG13_BRD4255A |
|
${SDK}/platform/emdrv |
micro-controller drivers |
|
${SDK}/platform/emlib |
peripherals library |
|
${SDK}/platform/Device/SiliconLabs/ZGM13 |
devkit board hardware access |
|
${SDK}/platform/bootloader |
boot code |
|
${SDK}/platform/CMSIS |
another hardware abstraction layer |
|
${SDK}/Apps |
ZWave demo programs |
ZWave Application Framework
The ZWave Application Framework is built atop FreeRTOS, a simple operating system. The OS provides tasks (processes/threads), events for communication, and queues for storing them. It offers semaphores/mutexes to synchronize access to queues and other resources. Timers can trigger one-off callbacks at a point in the future, or fire periodically. At a low level the OS has interrupt support and memory allocation.
We can group the framework's files into the following categories:
-
Framework - common defines and access to global variables.
-
Hardware - devkit components including LEDs and indicator, and buttons and sliders; on-chip blocks like I/O pins, an ADC, and UARTs. The key file is board.h.
-
ZWave Network - learn mode and SmartStart. The key file is ZAF_network_learn.h to monitor progress, although most of the process happens automatically within the framework.
-
ZWave Communication - outgoing packets (with separate buffers for requests and responses) and incoming frame router (per frame type or command, either explicitly for application commands or indirectly via the CommandPublisher), endpoint management, lifeline support, multicasting, security. The key files are ZW_TransportSecProtocol.h and ZW_TransportEndpoint.h, and ZAF_CmdPublisher.h to route frames to command classes.
-
Events - user event ("job") queues. The key file is ev_man.h.
-
Software Timer - interface to timer, EM4 hibernation management. The key file is AppTimer.h.
-
Non-Volatile Memory - access to persistent storage of objects. The key file is ZAF_nvm3_app.h.
-
Power Management - chip power mode. The only file is ZAF_PM_Wrapper.h.
-
Command Classes - implementation of several common ZWave commands.
The framework essentially sets up an event loop, with three handlers for incoming frames, ZWave events from frames ZAF has handled, and hardware events. Dealing with incoming packets is a bit confusing. One handler, registered with the framework, routes based on the type of packet: single- or multi-cast, node update, or security event. A second, implementing a stub in the transport protocol, gets the frame's contents unpacked into a per-command class structure (which are grouped in a giant union) and must send it to the appropriate command class handler. A third router, the CommandPublisher, can be called within the first, single-cast, handler; it will do this unpacking and itself call the command class. Outgoing packets are easier, as the command classes put them in the appropriate REQUEST or RESPONSE transmit buffer.
Creating A Project
We want to start with a blank slate and do the minimum necessary to get a project to build. To do this we created a single source file with a single function definition, then iteratively changed project and build settings or linked files or added to the source, fixing each compile problem that arose. Our project directory structure will be a bit different than the demo programs; see the table for the layout. You may notice Simplicity Studio making several more entries under the project. The build directory 'GNU ARM v7.2.1 - Debug' exists on disk. 'Includes' and 'Binaries' do not. You will see them only within Simplicity Studio. The first are the header files from the Project Properties list, the second has links to the object files.
|
directory |
custom files (on disk) |
linked files |
|
hw/ |
LCD drivers |
other hardware files |
|
src/ |
application, ZAF headers, I2C header |
|
|
ZAF_AppUtil/ |
modified framework files |
ZAF source files |
|
ZAF_CC/ |
ZWave command classes |
default command classes |
|
GNU ARM v7.2.1 - Debug/ |
none |
auto-generated directory |
To begin, choose Project -> New -> Silicon Labs MCU Project form the menu. If the DevKit board is plugged in the boards, part, and SDK will be filled in correctly. Pick Empty Project then enter a name.
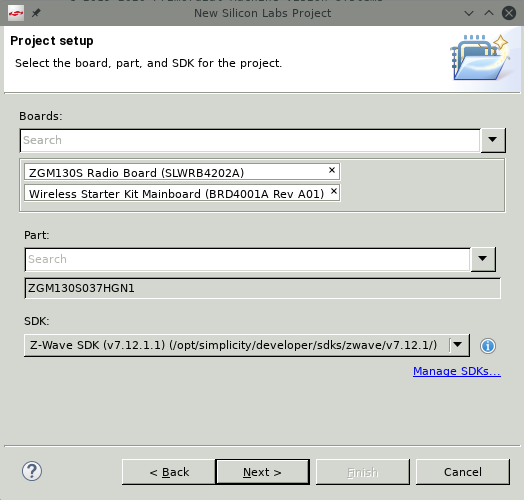
First dialog to create a new project. Boards, Part, and SDK are automatically detected by Simplicity Studio. Follow the Next chain from here.
Open the Project Properties dialog and verify Simplicity Studio has created the four Linked Resources/Path Variables: STUDIO_SDK_LOC, STUDIO_TOOLCHAIN_LOC, STUDIO_APACK_COMMANDER_LOC, STUDIO_APACK_LOC.
Create the file src/HTSensor1.c and put one function, ApplicationInit(), in it.
To get this to compile requires:
-
Adding ${SDK}/ZWave/API to the C/C++ Build/Settings Include list.
-
Adding the path ${SDK}/ZWave/lib and the library ZWaveSlave to Linker/Libraries.
-
Setting the linker script under Properties/Memory Layout to ${SDK}/ZWave/linkerscripts/zgm13‑zw700.ld.
-
Creating a folder hw/ under the project.
-
Linking the file ${SDK}/platform/Device/SiliconLabs/ZGM13/Source/system_zgm13.c under hw/. This is code for the devkit board clocks.
-
Linking ${SDK}/platform/Device/SiliconLabs/ZGM13/Source/GCC/startup_zgm13.S under hw/. This is code called when the devkit board boots, for example registering interrupt handlers.
-
Adding ${SDK}/platform/Device/SiliconLabs/ZGM13/Include to the C/C++ Include list.
-
Adding 'ZGM130S037HGN1=1' to the C/C++ Symbols list. This includes the right header file for the board.
-
Adding ${SDK}/platform/CMSIS/Include to the C/C++ Include list.
-
Adding the path ${SDK}/SubTree/rail-import/platform/radio/rail_lib/autogen/librail_release and the library rail_efr32xg13_gcc_release to Linker/Libraries. This is a library for testing and adjusting the radio when bringing up a new design.
-
Linking the file ${SDK}/ZAF/ApplicationUtilties/application_properties.c under ZAF_AppUtil/. The bootloader uses this code to determine the application version.
-
Adding 'EMR32ZG=1' to the C/C++ Symbols list. If not defined application_properties.c will be an empty file.
-
Creating the file src/config_app.h. The minimum contents define the symbols APP_VERSION, APP_REVISION, APP_PATH, APP_MANUFACTURER_ID, APP_PRODUCT_ID, and an enum _PRODUCT_TYPE_ID_ENUM; all are needed by the boot loader for version tracking. The values are placeholders and will not pass ZWave certification (especially the manufacturer ID).
-
Adding ${SDK}/platform/bootloader to the C/C++ Include list.
-
Adding {$workspace_loc:/${ProjName}/src} to the C/C++ Include list, where ProjName is whatever you used when creating the project.
Use ${STUDIO_SDK_LOC} instead of our abbreviation ${SDK}, except when changing values in the Project Properties dialog; then, use ${StudioSdkPath}. All file linking is done within Simplicity Studio by right clicking in the Project Explorer and choosing New -> File, then checking the Link box under the Advanced button and filling in the path.
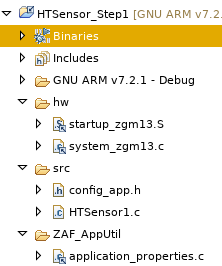
Project contents. Note linked files (with arrows on icons) exist only in Simplicity Studio, not on disk.
Or in table form (since the listing will soon be too long for a screenshot)
|
hw/ |
src/ |
ZAF_AppUtil/ |
ZAF_CC/ |
|
|
config_app.h |
|
|
|
|
HTSensor1.c |
|
|
|
linked within Simplicity Studio |
|||
|
startup_zgm13.S |
|
application_properties.c |
|
|
system_zgm13.c |
|
|
|
Stepping back, we've had to add boot code (ZGM13), libraries for Zwave and radio testing, and some application framework startup code to our simple "application". We added four directories to the include list, defined two symbols to enable hardware functionality, and linked to three source files that will be compiled along with our application. We also had to define a minimal set of version and product information for the framework.
The program will now compile. Object files are put in the build directory, and the Binaries entry in the project will have a .hex file that can be flashed to the devkit, as described in INS14280 Section 6. Nothing will happen, yet. Let's add in hardware support, starting with the buttons and LEDs.